


Complete Tomato Care Guide
Top Tips for Growing Terrific Tomatoes
Whether in ground or containers; from seed or transplant
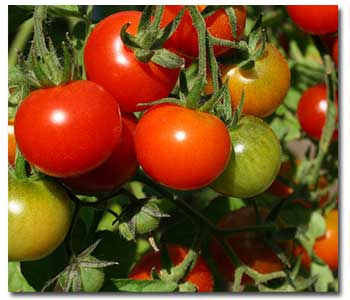
Nothing beats fresh homegrown tomatoes. Their grade and sauces, salads, and sliced with just a dash of sea salt and fresh ground pepper. Even if you don’t think you have a green thumb, these easy-to-follow guide will have you enjoying your own tomatoes in no time!
The Right Time and Place for Planting
All plants have their favorite seasons and tomatoes are no exception. Tomatoes grow when the weather and soil is warm; this is typically in early March if you’re near the coast and 2 to 4 weeks later inland. Tomatoes planted at this time typically fruit for 2 to 3 months during the summer. A second planting is a great idea if you want tomatoes during the fall; the second planting should be in June or early July. To get the most tomatoes from your plants, plant them in spots where they’ll get at least eight hours of sunlight each day.
Getting the Ground Ready: Soil Preparation and Fertilizing
Tomatoes are very forgiving plants when it comes to the type of soil in which their planted. They do need good drainage, though. If your soil is sandy or contains a lot of clay, mixing in some compost helps increase the nutrient content. There are many different types of fertilizers available. The Garden Pro’s at your local Grangetto’s can point out the one that’s best for your growing needs. A good vegetable starter fertilizer is one that contains nitrogen, phosphorus, and potassium. Simply spread the fertilizer over your garden and work it into the soil to a depth of 8 inches using a spade, shovel or Rototiller for large areas.
You’ll want to add some more fertilizer when your plants begin to produce fruit. Just spread it around the plants approximately 1 foot from the stems, then rake it into the soil and water the plants. As long as your tomato plants are producing new fruit, apply some more fertilizer once a month or as directed on your package label. You may want to consider applying a good bloom formula when the start to bloom. Gro Power® Flower ‘n’ Bloome is a good choice.
Gardens on the Go
Container gardening is growing in popularity as those without garden space discover the joy of growing their own food. Apartment and city dwellers can grow just about anything in a container garden on patios, balconies and even windowsills. Tomatoe plants fare better (will produce more fruit) if their planted in larger containers although they many varieties will do well in 5 gallon plastic nursery containers. Once you’ve chosen your containers, fill them with a quality potting soil such as Gardner & Bloome® Eden Valley® Blend. You’ll have to water and fertilize your container tomatoes more often than those planted in a regular garden because of the smaller soil volume. Harmful amounts of salt can build up in the soil without proper watering; water your plants when the soil just starts to dry. Water your plants until some of the water drains out the bottom of the container. Use a quality organic fertilizer such as Dr. Earth® Vegetable and Tomato Food as directed on the label.
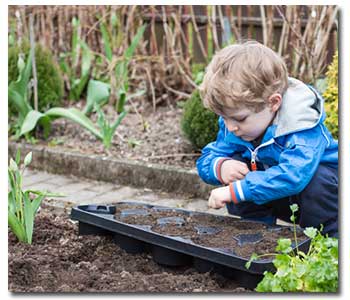
Starting from Seed
If you’re interested in a “from scratch” garden experience, planting your tomatoes from seed is right for you. There are a couple different ways to do this, one is planting them directly in the garden, and the other is to start them in containers. You’ll need to plant your tomato seeds when the soil is warm, around 75°F, if you’re planting directly outside. If you’re planting in containers, you need to plant the seeds 6 to 8 weeks before you’re ready to transplant. Grangetto’s Speedy Roots Seed Starter Trays are perfect for starting seeds indoors.
Whether you’re planting outdoors or indoors put 2 to 4 seeds in each area, cover them with about a quarter inch of soil and water the soil thoroughly. Lightly water the area when you notice the surface getting too dry. If you’re planting indoors, once the seedlings sprout they need to get sun (or use a grow light) for at least eight hours a day. Thin the seedlings once they have two sets of leaves, leaving only the strongest seedling in each pot. Keeping the soil moist is important during the sprouting process!
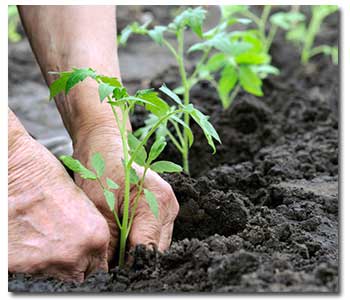
Tomato Transplants
If planting from seed is not for you, your local Grangetto’s can provide young tomato plants. When choosing your young plants, look for healthy plants with leaves that have a medium green color. Your young tomatoes should be planted as soon after you buy them as possible. It’s an easy process, just dig a hole deep enough to allow the soil ball/roots to be covered well with the soil. Space your plants 2 to 3 feet apart and water them right after you plant them making sure to wet the soil at least 2 to 3 inches deep. Transplant successful!
Here Comes the Sun
As we’ve already mentioned, tomatoes like at least eight hours per day of good sunlight. While full sun is optimal, not everyone gets full sun on their gardens or patios. Optimum exposure also depends to some degree and a variety of tomato you plant. If the plant produces large tomatoes, it needs more sunlight. Less sunlight is required for smaller tomatoes. However, your plants need at least six hours of sunlight in order to produce fruit.
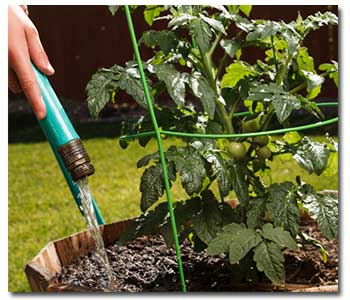
Watering: How Often and How Much?
During the first month after transplant, you want to water your plants roughly once every seven days. Typically, that’s about every time the soil begins to dry out on the surface. After the first month, watch your tomatoes’ leaves to help you determine when to water. Check in the coolness of the morning; if the leaves are drooping, that’s the perfect time to water. Make sure you record this first watering as you won’t water again until you notice drooping leaves in the cool morning. Once you see that, water again. Now you know how often you need to water your mature plants. This is typically once every 5 to 7 days depending on the weather. If your plants are in sandy soil, you may need to water more often; but, if your soil contains more clay, you’ll need to water less. One note of caution to avoid overwatering: it’s natural for your tomatoes’ leaves to droop in the midmorning or afternoon heat. Don’t water them then. Always check and water in the coolness of morning. Don’t forget if your plants are in containers or a raised bed, you may need to water more!
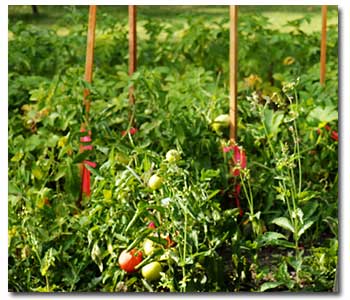
Supporting Your Plants
Tomatoes are binding plants. As such, they’ll spread out as they grow. Supporting your plants by tying them to wire cages or wooden stakes not only helps conserve garden space but, by lifting the fruits off of the ground it also helps reduce insect damage and decay. Tomato cages work perfect for this; whether your plants are in the ground, raised bed or large nursery pot.
Pruning Your Tomatoes
Other than proper watering, fertilizing and support, tomato plants are pretty hands off. Contrary to popular belief pruning the “suckers” doesn’t increase tomato production. In fact, pruning can actually decrease tomato production and increase the chances that your tomatoes will suffer sunscald.
Harvesting for Flavor

The flavor of fresh, homegrown tomatoes is one of the biggest reasons for growing them in the first place. You want to do everything you can to preserve that wonderful flavor. Proper nutrition and stress management lead to better flavors, while lack of nutrition, adverse weather and the stress caused by insects or disease produce less delicious tasting tomatoes. Overwatering is also a source of poor taste. The extra water dilutes sugars in the tomatoes making them taste bland. Always harvest 24 to 48 hours after watering; the sugars in the fruit will be more concentrated providing a better taste.
The simplest post-harvesting flavor preserving tip is not placing your freshly harvested tomatoes in the refrigerator. Tomatoes taste better when they’re stored at above 50°F, especially if you’re trying to maximize flavor on vine-ripened tomatoes.
Pesky Critters and Unpleasant Conditions
Tomatoes are among the most popular plants in anyone’s garden. Unfortunately, they also happen to be very popular with certain insects. And, just like their human gardeners, tomatoes can suffer from lack of hydration and overexposure to the sun. The two unpleasant conditions that most often affect tomatoes are Blossom End Rot and Sunscald. Fortunately, both of these conditions are easily treated.
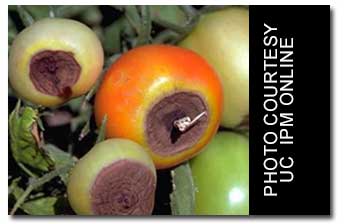
Blossom End Rot
You’ll know your tomatoes have end rot if the green fruit shows a sunken, tan colored leathery spot at the blossom. This condition is caused by a calcium deficiency that occurs when your tomatoes are under water stress. Water stress usually results from too infrequent watering. Excessive nitrogen fertilizer and high salt content in your soil can also lead to end rot. The easy fix is watering more thoroughly and more frequently.
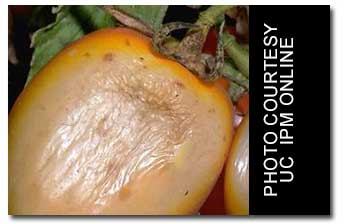
Sunscald
Think of this as really bad sunburn. Unfortunately for your tomatoes, applying a little aloe vera does not fix the problem. Sunscald results from overexposure to sunlight. Green tomatoes may develop a white or yellow spot on the side with too much sun exposure. As the green fruit ripens, the spot may stay yellow or even flatten out and turn grayish white with a dry, papery surface. Not much can be done to save the fruits affected by sun scald, however, it is preventable. Foliage growth is important as it shades the fruit. Providing proper support and not pruning your plants will help to provide the necessary shade. Ensuring that your young plants are watered and fertilize properly also encourages more foliage growth.
Some other pests/diseases to be aware of
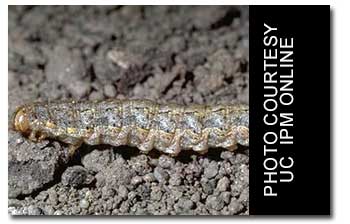
Cutworms
This is the common name for the larvae of many different types of moths. They vary in color from gray, brown or black and often a mix of colors. Adult cutworms are about 1 ½ inches long and typically curl up when you uncover them. The worst ones spend a lot of time in the soil feeding on the tomato plants at the ground level. You can protect your seedlings or transplants with 2 to 3 inch high collars made of heavy paper or cardboard.
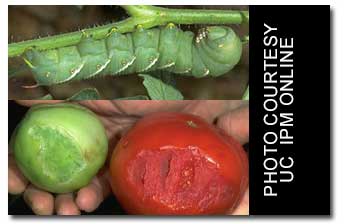
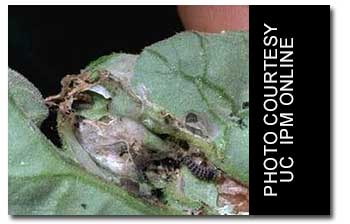
Hornworm
Hornworms are the larval form of Sphinx moths. There are about 4 inches long and green with lighter stripes, either lengthwise or diagonally, along both sides of their bodies. Hornworms had a horn on their backs toward the end of their bodies, contributing to their name. They are particularly fond of eating tomato leaves and portions of immature fruits. There most active at night and deposit their eggs on your tomato plants. If you notice hornworms on your tomatoes, hand pick them and remove them or cut them in half with pruning shears. To help control these pests, you can also apply Bacillus thuringiensis spinosad (Bt.) or carbaryl (Sevin).
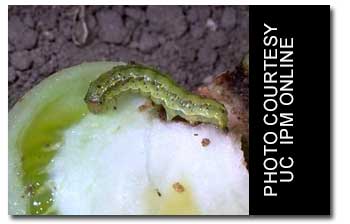
Tomato Fruitworm
These worms grow to about 1 ½ inches long. Their color varies from greenish yellow to pink to a deep brown with dark stripes along their backs with light green or flesh colored undersides. They love to feed on tomato leaves but also tunnel into the fruits themselves. If you notice this past on your plants, you can apply Bt. or Sevin. Make sure to remove and throw away any wormy fruit.
Pinworm
Pinworms live up to their name; these pests are never bigger than a quarter of an inch. The Young worms are light pink in color, of the older ones are purple. They typically enter the fruits near the stem and after which they tunnel into the core and fleshy areas surrounding the core of the fruits. Applying a product containing spinosad (organic) or carbaryl (Sevin) before worms enter fruit is a good way to control pinworms.
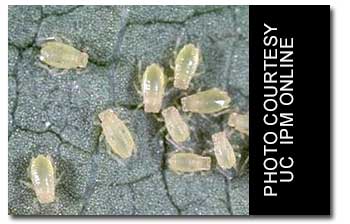
Aphids
These pests are small with soft, black, green, yellow or pink bodies. Their colonies usually make their homes on a plant’s leaves and stems. They feed by sucking fluids from the plant and leave honeydew, a sticky liquid, behind. There is a black, sooty mold fungus that thrives on honeydew. Washing your plants with water or spraying aphids with insecticidal soap helps to reduce infestation. Pyrethrin, a natural insecticidal made from chrysanthemums, is also useful in controlling aphids. You may also want to start your own colony of ladybugs as these beautiful insects love to eat aphids.
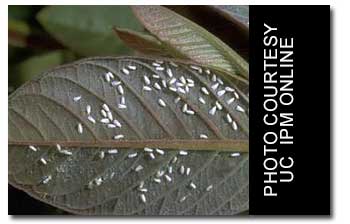
Whiteflies
These insects are small and resemble months, with powdery white wings and bodies. They hide their young on the underside of leaves, where the immobile greenish yellow larvae feed on sap just as aphids do. Tomatoes can withstand a small infestation of whiteflies and still be productive. Use Insecticidal soap to control these pests.
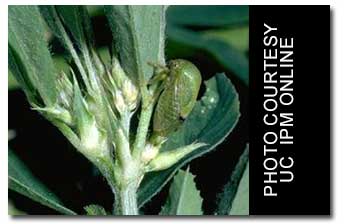
Buffalo Treehoppers
These pests slit open tomato stems and lay eggs in the openings. There larvae are dark green in color with black spines. Much like aphids and whiteflies, buffalo tree hoppers live on plant stems and feet on sap. Pyrethrin, malathion and insecticidal soap are all good controls for these pests.
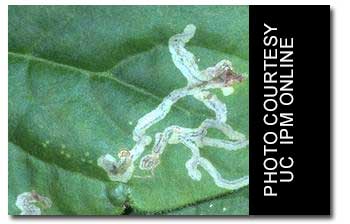
Leafminers
These engineering pests create thin white tunnels and plant leaves. Leafminers are actually the larvae of many different species, most especially certain flies. Typically, they don’t cause any serious damage on tomato plants. Remove any leaves that have mines and use a product containing Spinosad to control these pests.
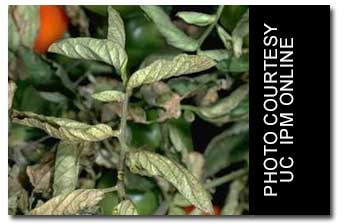
Russet Mites
You’ll never see this past, and less you’re looking with a 20 power hand lens. Then, you’ll see tiny mites with pear-shaped bodies that are colored whitish yellow. Russet mites move very slowly and feed on stems and leaves. If the lower stems and leaves look bronze or oily brown, you know you have a russet mite infection. As the infestation grows, leaves that are damaged dry out and fall off the plant. A good method for avoiding russet mite infestation is to avoid growing your tomatoes near potatoes, petunias, or other plants that host the russet mite. Another method of control is the application of sulfur duster spray when symptoms first appear. It may take more than one application to control the infestation. Be careful though, as sulfur may injure your plants during hot weather. Also make sure to wash any fruits you’ve treated before you eat them or canned them.
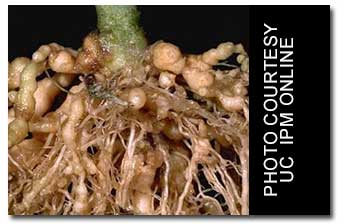
Root Knot Nematodes
Last on the hit parade of pests is the soil dwelling microscopic eelworm known as the root knot nematode. These pests choose small roots as their food source, which causes the roots to form growths called galls. Once the roots are damaged, they can’t properly absorb water which often results in wilted plants. There are tomato plants that are resistant to the root knot nematode and your local Grangetto’s can point them out to you.
Despite the impressive list of pests that target tomatoes, most plants will never see them. And if they do, most of them are easily controlled. As long as you follow these tips, you’ll grow terrific tomatoes and have a bountiful harvest of delicious eating.


