


Growing Your Own Juicy Tomatoes
In four easy steps
Fresh tomatoes grown in your garden and ripened on the vine will taste better and be healthier than any other tomatoes you’ve ever tried. Follow these few easy to ensure a healthy and bountiful harvest.
Things you may need:
- Tomato seeds
- Tomato transplants
- Soil/Compost
- Pots or Pre-filled seed starting trays
- Trowel
- Tomato Cage
- Fertilizer
First, decide how you want to start your tomato plants.
You have three main choices:
Pre-planted Starts
The easy method is to buy small starter plants. Choose a few appealing varieties and simply transplant them into a sunny location in your garden (in early March or after frost is not a threat), preferably into soil amended with rich organic compost and/or organic fertilizer. Select a disease-resistant VF-1 hybrid variety, such as Ace, Better Boy, Celebrity, Early Girl or one that’s appropriate for your needs and climate zone. Try to do transplanting during cool hours in the morning or evening so the plants do not suffer excessive shock in the process. If your plants look a little sad the first day or two there is no need to worry. The plants are simply adjusting to their new home. Make sure to place a tomato cage around the plants before they get too big.
From Seeds
Starting seeds indoors gives you a head start since you can begin the process at the end of winter. In warmer climantes you can start as early as January indoors. You will need some small plastic containers, tomato seeds, and a bag of rich organic soil such as Kellogg® Gardner & Bloome® Potting soil. You may also purchase pre-filled trays which already have the planting media inside. We recommend Speedy Roots. When selecting seeds, decide whether you want small sweet cherry tomatoes or larger varieties. Some favorites are of the herirloom varieties like Cherokee Purple and Brandywine because of their meatiness and sweetness. There is an enormous variety of seeds available. We stock several varieties from grape, cherry, roma to big beef and unique heirloom varieties. Once you have chosen your seeds fill small plastic nursery cups with organic soil and sprinkle a few seeds around the top. Push the seeds gently under the soil about a 1/4 inch or less. Make sure the soil remains moist at all times. Place containers close to a natural source of light or under florescent lights for at least 6 hours each day. Within 10 days (when it is warm they sometimes sprout overnight) you should see sprouts.
If you plan to sow the seeds directly into the garden make sure that the soil temperature has warmed to at least 65 degrees Fahrenheit. Choose a sunny location in your garden and work the soil well. It is a good idea to add some organic compost such as Grangetto’s Organic compost or Kellogg® Amend®. Spread your tomato seeds around your growing area and then sprinkle a layer of good soil on top of the seed so that all are covered but not deeper than a 1/4 inch. Kellogg® Topper works great for this. You should water the area once each day either in the morning or evening when it’s not too hot outside. While the seeds are still young it is important to keep a consistent amount of moisture in the soil.
Second – Transplanting
If you started your seeds indoors and your sprouts are now established you should start thinking about transplanting them into your garden. It is a good rule of thumb to transplant once the seedlings have reached 3-4 inches in height although you can let them remain indoors If the weather has not warmed up enough. Remember that it is important to wait until temperatures remain consistently in the sixty five degree range before you transplant. To gauge soil temperature, soil thermometers are available at nurseries and hardware stores.
Preparing to transplant: Mark the location of where you want your plant to grow by making a three inch hole in the top soil with your index finger. Make sure to space each hole at least 3′ in all directions. Tomatoes need space to grow! Once you have all your holes marked gently pinch the soil directly below each sprout and pull out of the container. Place the clump of soil and sprout in each hole that you previously made and push the sprout in the ground firmly making sure that it is as erect as possible. Once you complete this step lightly water the area.
If you started your seeds outdoors and a significant amount of sprouting has occurred you can begin to realign your seedlings so they have adequate spacing. If some sprouts look weak discard them and choose those which look most healthy. Follow the transplanting steps discussed above. Be gentle with each sprout as you pinch them from their original position and place them in another.
Third – Regular maintenance
Now the process of regular maintenance has begun. Your plants will begin to establish themselves, and during this period it is only necessary to ensure that the soil remains relatively moist. As seedlings begin to grow they will become more resistant and will require less watering but tomatoes are thirsty. Make sure to soak the plant good at least 2-3 times per week throughout the growing season. Fertilize your planting areas once every 3-4 weeks to guarantee beautiful fruits. There are many types of plant foods on the market. Organic or conventional? We have a large selection to choose from; only the best, so stop on by.
Once the warm days of summer arrive your tomato plants will take off and start to resemble vines. They will grow in all directions and get rather large. Before the plants get too big it is a good idea to create a training system for the plants. Tomato cages are one of the best and easiest ways to support them. Sturdy Cage makes a really nice green cage this is not only attractive, but won’t rust if it rains.
Fourth – Harvesting
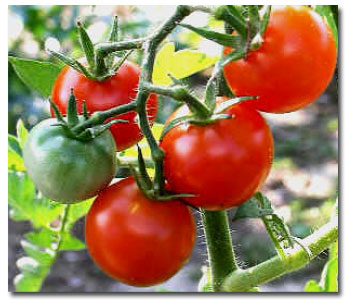
Harvesting in Southern California is generally around mid-July. Each different type of tomato plant will produce fruit at a different time. Yellow flowers will transform into small green tomatoes and you will know it’s time to harvest your tomatoes because they will have changed color from green to their maturity color of red, yellow, orange, or even purple depending on the variety. Ripened tomatoes will easily give way from the vine.
Enjoy your home-grown tomatoes!


