


Made with Love & Pallets

Pallet Gardens “Verticle Gardening”
DIY! Turn a pallet into a garden. The possibilities are endless; color, vegetables, herbs or both! Why not plant upright for small spaces or to jazz up an area of your yard or patio. Pallet gardening is easy and can be a fun project for the kids.
One of the biggest problems vertical gardening addresses is how to create more gardening space in our ever-shrinking gardens. For this problem, vertical gardening is a great option. Vertical gardening can be used to disguise unattractive parts of the landscape, provide the means of creating and defining garden “rooms” or to add a striking focal point to a garden.
Vertical gardening can be done with ornamentals as well as fruits and vegetables. Given the correct structure, it can be done with almost any perennial, annual, vine or ground-cover, even succulents. It can be used to create a solid wall of flower color or a beautiful mosaic-like pattern, using plants with different foliage colors and textures.
For baby-boomers (and beyond) out there, it can save wear and tear on knees, backs, etc. because the plants are at eye level and therefore easier to tend. Growing vertically also creates a whole new dimension in which to enjoy the plants’ attributes: beautiful foliage, colorful flowers, fragrance, etc.
The plants themselves can benefit from being grown vertically. Air circulation is better, leading to fewer fungus diseases. Vegetables and fruits that are not lying on the ground will be cleaner and less likely to rot, so the yield per square foot of gardening space will be increased.
The main down-side of vertical growing is that the plants will be exposed to more sun and wind, so they will dry out more quickly and thus may need more frequent watering.
You can purchase a ready-made structure for your vertical garden, but you can also easily make a low-cost one yourself.
Here are the materials you will need:
- A pallet (more on that, below).
- Sandpaper (if desired).
- A small roll of landscape fabric.
- A staple gun.
- Staples.
- Plants of your choice, in containers small enough to fit between the boards of the pallet.
- Good-quality potting soil. Roughly two large bags.
So here are the steps to make your pallet garden a success:
For the main structure, you will be using the pallet. These can sometimes be found in or near dumpsters behind grocery stores or warehouse-type stores or at garden centers. Be sure to choose a pallet that is in good condition, with no split or rotted wood. Once you get it home, if it does need a little TLC, you should be able to easily provide it by nailing any loose boards and sanding any particularly rough spots. Give your pallet a final look and choose the best-looking side for the front. If you intend to put edibles in your pallet, be sure to find one that was heat treated as opposed to fumigated with pesticides.
Collect Your Supplies
As mentioned above, gather your supplies and prepare them ahead of time so you can dive into your pallet garden project without having to stop and run to the hardware store or garden center again. For this project, you’ll need the pallet you found, 2 large bags of potting soil, 16 six packs of annual flowers (one six pack per opening on the face of the pallet, and two six packs per opening on the top of the completed pallet garden), a small roll of landscape fabric, a staple gun, staples, and sand paper.
Get Your Pallet into Shape
Once you’ve dragged your pallet home, give it a once over. Are any of the boards a little loose? Is the wood chipping in places? Nail down any loose boards, and use sand paper to smooth down any rough spots.
Add the landscape fabric
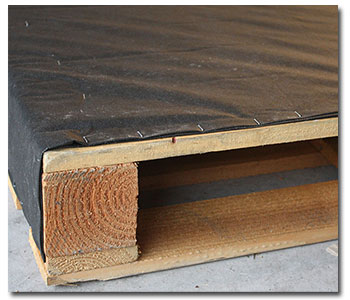
Decide which side of the pallet will be the bottom when the pallet garden is completed and leaning against the wall. Lay the pallet face-down and roll the landscape fabric over the back. Cut two identically sized pieces that are long enough to go from the top edge of the back of the pallet and wrap all the way around the bottom, plus a few extra inches.
Holding the two pieces of fabric together and starting at the top, turn the edges under an inch and begin stapling the fabric (at 2″ intervals) all along the top board. The pallet should be centered on the fabric so that there is enough fabric to wrap around the sides and bottom, eventually covering all these surfaces. At the bottom corners, pretend you are wrapping a present and fold the corners to make them smooth and neat, then continue along the sides. Stretch the fabric a little as you go to make sure it is taut while continuing to staple the top, right edge. You do not want it to give way once it is planted so add a staple every two inches. At the end of this part, you will have created a container–it is open on the top and in the front between the boards (the boards should be running horizontally), but all other sides are securely covered with landscape fabric.
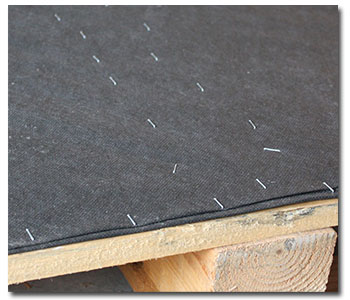
You should now have a pallet with landscape fabric wrapped around the sides, back, and bottom. Place more staples along the spine of the back side of the pallet, and anywhere else you think the fabric needs to be held down so that soil can’t creep into places you don’t want it to go.
Adding Plants
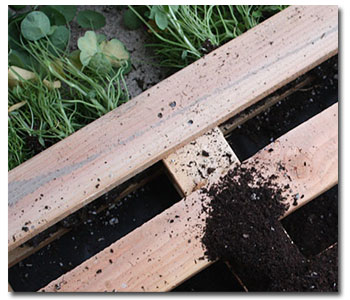
Now lay the pallet face-up near its eventual home (it will probably be fairly heavy, once it is completed). Make sure all the plants are moist. Remove them from their containers and position them, closely spaced, along the top of your pallet. Place them so that they are slightly down from the top board, so that there will be room for watering. Now, starting at the bottom, push potting soil into the area between the last opening and the landscape fabric on the bottom; then plant the space above it. Continue on in this manner until you reach the top. When using the potting soil, make sure that it is pressed in tightly; if it is too loose, you will be unable to water effectively and everything will be unstable and “shrink.” Your plants should be packed in as tightly as possible. Although, all the plants don’t need to be “trailers,” some trailing plants are desirable–these will help cover the front boards of the pallet.
Caring and Placement of Your Pallet Garden
Once it is planted, it is best to leave the pallet flat on the ground for a while so that the roots will begin to grow and the structure will be more stable. Now you are ready to hang or place your pallet where it will remain from here on out. If hanging on a wall, make sure that your hardware is sufficient to support the weight of your pallet. If you have a larger wall, consider planting several pallets, either placed side-by-side, or maybe offset a little with other pieces of garden art between them.
Water your pallet regularly, they dry out quickly. Pay special attention to the bottom two openings, they seem to be the driest. Fertilize with water soluble fertilizer added to your watering can (follow package instructions for amount and frequency).
We hope you’ll consider giving vertical gardening a try. There are so many possibilities to create just the right ambiance for your garden. Have fun with it and make it your own. If you are doing this with the kids, they will love making their very own pallet garden!


